Showing posts with label semi-homemade with Annalee. Show all posts

Tuesday, October 21, 2014

Hawaiin BBQ Chicken Pizza

I've started making menus for each week to cut grocery costs and so we're not left in a lurch with me not wanting to cook all the time.  I bought a super cute vinyl chalkboard sticker and some plywood and voila- cute menu board!  No, you can't see it yet because it's still lacking a frame so it's kind of naked.  As soon as we rectify that sitch, you can have a gander!

I found this recipe from one of my favorite blogs, 3 Ladies and Their Gent!  Seriously Amber knows her way around a kitchen!  Being a wife, mother to twins, blogger and dietician it's amazing how she always looks so amazing and feeds her family.  I am in serious awe.  You can find her original recipe, here.

Hawaiian BBQ Chicken Pizza


Ingredients:
1 tube Pillsbury Wheat Pizza Crust
1/2 cup of your favorite BBQ sauce (we used Sweet Baby Ray's, Sweet n' Spicy!)
1 (15oz) can pineapple, drained or fresh pineapple
1/2 red onion, thinly sliced
2 grilled chicken breasts, or 1/2lb left over chicken- chopped
1-2 cup(s) monterey jack cheese, shredded


Directions:
Preheat your oven to 400 degrees.

Grill chicken and let rest until ready to add to pizza.

Roll out the pizza crust dough onto a greased, medium sized rimmed baking sheet, flattening it to fit to the corners.

Place the pizza crust into the oven for 6-9 minutes (or as directed on tube), until slightly puffed and beginning to turn golden brown. Remove from oven.

Spread BBQ sauce evenly over crust.  Sprinkle some of your cheese on top and then add chicken breast.  Next, add the pineapple and onion, as much or as little as you like.

  Top evenly with shredded cheese.

Place back into the heated oven for another 6-8 minutes until the cheese is melted and the crust is golden brown (and delicious!)


What's your favorite quick and healthy meal?

Until next time...


Monday, December 2, 2013

How to upcycle Thanksgiving leftovers!

So I hear you've got this fridge full of food and in about T-minus yesterday you're going to be sick of leftovers?  Well, I've got your back boo!

No one wants that food to go to waste with the starving children everywhere, so I've got some meal and just plain great ideas for you!  Here are some awesome recipes from my "Holidays" Pinterest Board to turn those lemons into lemonade! 


Leftover potatoes?  No problem!  Latkes?  Yes, please! 
Cheesy Leftover Mashed Potato Pancakes
                   
Potato Rings with Homemade Buttermilk Ranch Dip

Rolls got you runnin'?  Make these!
Louisiana Bread Pudding with Whiskey Sauce

Sweet Ham and Swiss Sliders

Turkey taking over your life?  Try these!
Leftover Turkey Pot Pie with Cheddar Biscuit Crust

The Best Turkey Soup

Cranberry invasion?  Squash that here!
Cranberry Margaritas
White Chocolate Cranberry Fudge

Fruit got ya feeling funky?  Transform it here!
Fruit Parfaits

Smoothies!


Stuffing got you gagging?  Hold on to your knickers!
 
Stuffing Leftover Eggs Benedict
Stuffing Stuffed Mushrooms


Veggie tray worrying you?  Not a problem, outsmart those veggies here!
Orange Chicken & Vegetable Stir fry


 And...

Easy Veggie Pizza

Ingredients
1 can crescent rolls
all leftover veggies  (carrots, brocc, peppers, onion, green onions...etc)
8oz (or more) Chive & Onion Cream Cheese
Garlic Salt & Pepper

Directions
1.  Lightly grease baking sheet.  Roll out crescent rolls on baking sheet and squish together to make crust.  Bake as directed.

2.  Chop up all leftover veggies into small pieces and place in bowl.  Season w/garlic salt & pepper and stir.

3.  Once crescent roll crust has cooled, spread with chive & onion cream cheese.

4.  In one even layer place all of the vegetables on crust.  Push down to ensure adhesion with cream cheese.  Voila, healthy-ish veggie pizza!


You're all set!  Here's to no more wasted leftovers!  Hooray!!

Until next time...

Wednesday, November 27, 2013

Thanksgiving from scratch!

It seems only fitting that this is my 100th post AND I get to check something off my 35x35 list!

Just call me Julia because I pulled off quite the amazing feat!  Except for one snaffou with the turkey not being defrosted because I forgot *oops* and having ham instead, everything went off without a hitch for my Thanksgiving from scratch!!

All of the recipes have been linked to their own little bloggy post for your delight!  Here is the menu that graced my kitchen table and left all of us stuffed to the gills.  Prepare your fat pants people, it's going to be a filling ride!


Appetizers:
Annalee's Smoked Salmon Dip
Veggie Tray! (if you need instructions, you should just buy everything)

Our Menu:
Ham w/homemade gravy
Fresh Green Beans (steam & add s/p, butter!)
Jackie Ladd's World Famous Rolls
Creamy mashed red potatoes
Sausage and Cornbread Stuffing
Brown Sugar & Marshmallow Yams

For Dessert: (These ended up being semi-homemade)
Pumpkin Cookies w/Cinnamon Frosting
Pumpkin Cheesecake


Feel free to make these at your next holiday gathering!  These recipes are sure to please even the hungriest of crowds!  

What an amazing time we all had together eating our fill and going into food coma's!  I know I say this a lot on here, but I am so thankful I married in to an amazing family!  My only wish is that my side of the family could be here to join us.  Next year! 

Happy Thanksgiving to you all!  

Until next time... 

Tuesday, November 26, 2013

From Yams to Yums!

Ok, it's corny but I couldn't think of anything else!

I am not a huge fan of yams unless they are covered in brown sugar, butter and marshmallows!  Can I get a witness?!  This, like all of my recipes, it very good and very easy!  My FIL (father-in-law) and I are the only real yam lovers in the house, so this year I decided to make smaller, individual servings!  Plus- any excuse to use my super cute ramekins and I'm in!!


Brown Sugar & Marshmallow Yams
Ingredients
Yams- duh!
Brown Sugar
Salted Butter
Jet Puffed Marshmallows

1.  Peel & Cut Yams into 1/2in or smaller cubes.  Boil in salted water until you can easily put a fork through them, about 10 min.  Drain.
2.   Place yams in a bowl with 2-3 tbs butter and mash until creamy.
3.  In ramekin, layer yam/sliver of butter/brown sugar twice and top with marshmallows.  Try to make sure no yams are poking out.  You may have to get a bit physical with them :) Sprinkle w/brown sugar.
4.  Bake @ 350 until marshmallows are a bit melted and golden brown.
5.  Let cool a smidge, yes that's a technical term, and serve!

You can also find this on Not Just a Housewife's and Bizzy Bakes  blog!

Until next time...

Monday, November 25, 2013

Go Stuff It!

This may be my favorite thing I made from my homemade Thanksgiving.  This recipe is simple and SO delicious.  I'm not a huge fan, ok I'm not a fan at all, of sweet/savory stuffing.  This baffles my mind since I love sweet/savory anything else but when it comes to Thanksgiving I need to keep it traditional.  Some might say, keepin' it classy.


Sausage and Cornbread Stuffing
2lbs pounds bulk Italian sausage (hot or mild)
2 onions chopped
7 large celery stalks, chopped
4 cloves garlic, minced
6 cups day-old French bread, cut into 1/2 cubes
3 cups crumbled cornbread
1 1/2 tbs rubbed dried sage
1 1/2 tbs poultry seasoning
1 tsp salt
4 cups chicken broth
2 cups shredded mozzarella cheese
1/2 butter
2 tbs chopped fresh sage (optional)
1 oz shaved parmesan cheese (optional)

1.  Preheat an oven to 375 and grease a deep 9x13 baking dish.

2.  Heat a large skillet over medium- high heat and stir in sausage.  Cook and stir until the sausage is crumbly, evenly browned.  Add in onions, garlic and celery and cook until the onion softens and meat is no longer pink.  Drain and discard any excess grease.  Please in seriously gigantic mixing bowl.  No, really.

3.  Add the French bread, cornbread, dried sage, poultry seasoning and salt; stir well.  Pour in the chicken broth and mozzarella cheese; stir until the chicken stock has been absorbed by the bread and the stuffing is mixed well.  Pour the mixture into the baking dish and dot with butter.  Cover with aluminum foil.


4.  Bake in preheated over for 45 min, then remove foil and continue baking until the top has turned a golden brown.  This should take about 15 min. 


Sprinkle with fresh sage and shaved parmesan cheese and serve. 
You can also find this on Not Just a Housewife's blog!

Until next time...


Sunday, November 24, 2013

Homemade Gravy

I'll admit, we've all had yucky gravy.  You know the kind... lumpy, under seasoned or from a package/can.  I was pretty open to whatever topping my mashed taters were going to be graced with before making this and now, I can confidently tell you I am a convert.  Never again will a pre-packaged gravy ever touch these lips... unless I'm at someone's house for dinner, I mean I'm not rude!
I digress...

This gravy is so simple you're going to wonder why you haven't done it before! 

First let's start with the base- potatoes!  Now everyone has their own way of making mashed potatoes and what I'm about to say will shock and possibly gross you out a bit!  Just bear with me, these are freaking delicious!


Potatoes ala Annalee

Red potatoes- boiled to perfection
3-4 tbs salted butter (or more Paula!)
1/2 cup olive oil mayo
Garlic Salt/Pepper to taste

Mix while still piping hot and taste!  I've also been known to throw an egg in the mixture but that freaks some people out.  My Belgian host mom did it and it was AMAZING.  You think you know creamy, but you don't until you add an egg! 

Ok, on to the toppings!


Homemade Gravy
1 cup ham (or other meat) drippings**
3-4 tablespoons flour
COLD water
1/8- 1/4 teaspoon salt

1.  Bring ham drippings to a boil.
2.  Mix flour and water to make a runny paste.
3.  Pour flour/water mixture in boiling ham drippings a little at a time making sure to be whisking at the same time.  Whisk until thickened.
4.  Add salt (if needed) to taste! 

I found it worked best with a flat whisk to really get all the clumps off the bottom.  With my ham glaze it worked like a charm!  So delicious. 

**I used pineapple slices & cloves on my ham with a glaze of 1/2 cup honey, 1/2 brown sugar and a cup of cranberry juice.  Finger licken good!

You're ready to slather your hearts desire in gravy!  You can also find this on Not Just a Housewife's blog!
Until next time...

Jackie Ladd's World Famous Rolls

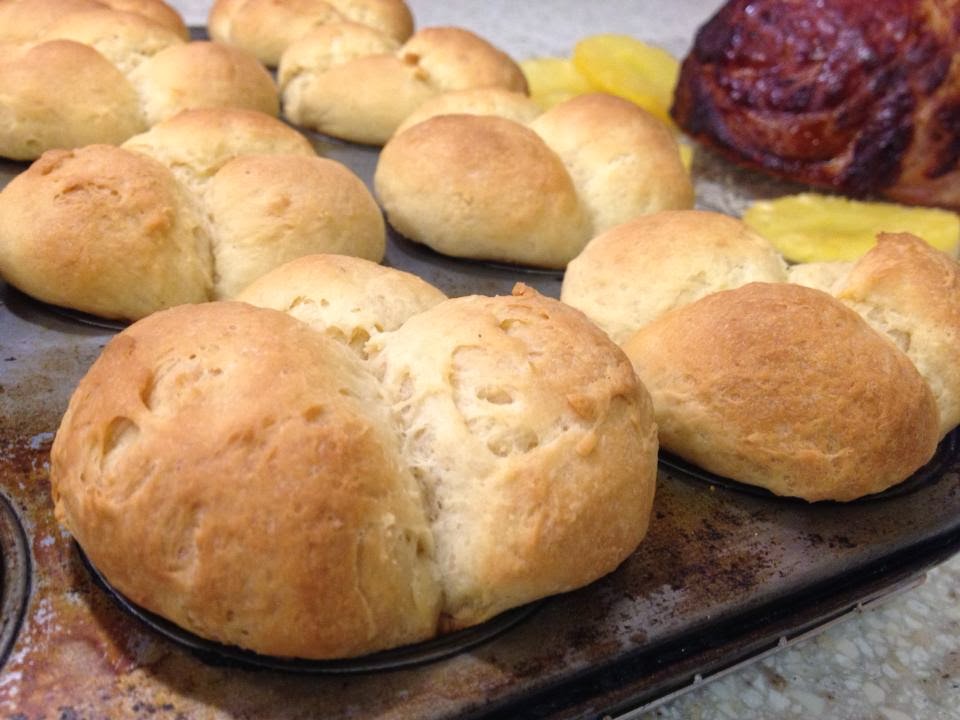
I'm pretty sure my MIL's name should be St. Jackie.  She is seriously amazing!  When I told her about my ambitious plans to make Thanksgiving from scratch, she instantly asked if there was something I needed and if I wanted her help.  Of course, I gladly accepted!  I have to admit, I had an alterior motive, I wanted to learn how to make the recipe below.  These rolls are SO good!  They break apart at just the right places to give you buttery goodness in every bite.  Y_U_M!

I love learning all of the different things my in-laws can teach me.  They are completely different from my parents and I appreciate that because it affords me the chance to diversify myself and learn so much more!  Now, if I could only get my butt over there so she could teach me to sew- oy vey!


Jackie Ladd's World Famous Rolls

Ingredients
3 1/2 cups all-purpose flour
1 package active dry yeast
1 1/4 cups milk
1/4 cup sugar
1/4 cup shortening
1 teaspoon salt
1 egg

In mixing bowl combine 1 1/2 cups of the flour and the yeast.  Heat milk, sugar, shortening and salt just until warm (115-120) stirring constantly until shortening almost melts.  Add to dry mixture; add eggs.  Beat on low with an electric mixer for 1/2 minutes, scraping bowl.  Beat 3 minutes at high speed. 

By hand, stir in remaining flour to make a soft dough.  Shape into ball. 

Place in lightly greased bowl; turn once to grease surface.  Cover; let rise in warm place until the dough doubles.  This will take between 1 1/2 to 2 hours.  Punch down and turn out on floured surface.  Cover and let rest for 10 minutes. 

Shape into desired rolls.** Cover, let rise in warm place until double (30-45min).  Bake on greased baking sheets or in greased muffin tins at 400 degrees for 10-12 minutes.

Voila, heaven.  Or as close we we're getting here on earth! 

** St. Jackie rolls up three small balls to each muffin tin to get the desired effect shown above!  You can also find this on Not Just a Housewife's  and Bizzy Bakes' blog!

Until next time...
 

Friday, November 22, 2013

Homemade Cinnamon Icing

No cookies would ever be complete without icing!  I mean that's like a car without gas, it just doesn't work... well unless you're the chocolate chip cookie.  You win this one...

Anywho!  I whipped up this simple recipe for some *cough, cheating* I did on Thanksgiving.  I made some pumpkin cookies from a mix...never again... and thought they needed a little something.  This was in part to hide the "semi-homemade" taste of preservatives they had.  I'm learning, there is just something to be said for making things from scratch.

I am turning into to a scratch snob- wait, that sounded wrong.  You know what I mean.  I'm all for semi-homemaking it when you're in a crunch or if it's for a function you really don't care about (gasps, say it isn't so...) but when in doubt, scratch it out.  Err... I'm going to stop with that whole thing.

To the recipe!

Homemade Cinnamon Icing
Ingredients

1 stick of salted butter, softened
4 cups confectioner's sugar (powdered sugar)
1/4 cup milk (I used organic whole milk)
1 tsp. vanilla extract (optional)
1 to 2 tsp ground cinnamon

Directions
1.  Put the butter in a bowl and beat until smooth with a stand or hand mixer
2.  Add the confectioner's sugar, milk, vanilla (or omit if you like) and cinnamon*.
3.  Mix until blended and creamy.  Make sure to scrape the bowl to get any ninja cinnamon!
4.  Frost away!

* I used more cinnamon than the recipe calls for.  I kept adding it until I liked the taste.  To each their own...

This recipe could be altered to add a variety of flavors.  Think of it as a base(minus the cinnamon) and start adding extracts!  If you're not having fun in the kitchen, get out :)

Until next time ladies!  Frost yourselves! 


Thursday, November 21, 2013

Annalee's Smoked Salmon Dip

Living in Cordova I've learned that everyone has their own smoked salmon dip recipe.  There are some recipes that are more simple and then there's mine!  I'm pretty sure anyone that's met me would not describe me as "simple" and I'm hoping that's a good thing?  Que sera sera!  I do get loads of compliments on this and when native Cordovan's ask for it, it seriously makes my heart happy! 

via, but just for the picture b/c I forgot to take one!
Annalee's Smoked Salmon Dip

Ingredients
1 8oz Philadelphia Chive and Onion Cream Cheese (brand matters!)
1 bunch green onions finely chopped
1 jar smoked Bob Salmon** (skin, juice and ALL)

** Now, I realize that not all of you are privy to my Father-in-Law's AMAZING smoked salmon, but you'll just have to try to get the best can you can.  Try not to get a tuna fish looking one... *shudder*

Directions

Add together and enjoy!  See, I told you it was easy! 

Do make sure to chop up the salmon skin so you don't get a big hunk of slimy, fatty goodness in your mouth.  Awkward, and not like the show.  And yes, the skin is my secret ingredient because it is fatty and adds a really good flavor so use it!   

Until next time...

Thursday, November 14, 2013

Balsamic Pot Roast

Hidey Ho Neighbors!

As that fluffy white stuff starts to make an appearance in the Last Frontier, the meals get heartier and the people get sleepier.  The lack of vitamin D around here has some interesting consequences including but not limited to: hibernation, looking like a Cullen, drinking err maybe that's just me, game nights and copious amounts of comfort food.

I, like any good seasonally depressed sun lover, lack some serious motivation during this time of the year.  I'm perfectly fine scrounging for food but my inner Martha Stewart won't have it.  Enter, the crock pot.  My crock pot and I are tighter than the spanx I tried to put on this morning.  I can always count on this amazing apparatus to have my back and a warm delicious meal ready when the rumblies in my tumbly start knock, knock, knocking on my door.

I give you the amazing, the seriously easy and completely mouth watering:


Ingredients
  • 4-5lb beef roast
  • 1 1/2 c. beef broth
  • 1/2 c. brown sugar
  • 1/4 c. balsamic vinegar
  • 1 Tbsp soy sauce
  • 1 tsp salt
  • 1/4 tsp crushed red pepper flakes
  • 3 cloves garlic, pressed
  • 1 lb baby carrots
  • 2 lbs baby red potatoes, quartered
  • Extra salt, pepper and garlic to season roast

Instructions
  1.  Season your roast with salt, pepper and garlic.
  2. In a small bowl whisk together beef broth, brown sugar, balsamic vinegar, soy sauce, salt, red pepper flakes and garlic. -Taste it, anything going on something you're cooking, you should want to drink!
  3. Place beef roast in crock pot. Top with carrots and potatoes. Pour liquid mixture over the beef, carrots and potatoes.
  4. Cook on low for 6-8 hours.
Ingredients
  • 4-5lb beef roast
  • 1 1/2 c. beef broth
  • 1/2 c. brown sugar
  • 1/4 c. balsamic vinegar
  • 1 Tbsp soy sauce
  • 1 tsp salt
  • 1/4 tsp crushed red pepper flakes
  • 3 cloves garlic, pressed
  • 1 lb baby carrots
  • 2 lbs baby red potatoes, quartered
Instructions
  1. In a small bowl whisk together beef broth, brown sugar, balsamic vinegar, soy sauce, salt, red pepper flakes and garlic.
  2. Place beef roast in crock pot. Top with carrots and potatoes. Pour liquid mixture over the beef, carrots and potatoes.
  3. Cook on low for 6-8 hours.

Read more at http://www.julieseatsandtreats.com/2013/06/crock-pot-balsamic-roast/#6QDU1ZBgtedfMfcE.99

And because two nights of not cooking is always better than one, save the juice, add some swiss and a hoagie for french dip!  Voila! 


Another recipe from semi-homemade with Annalee
Until next time...

Thursday, October 24, 2013

What the Pho?


I love a great soup as much as the next person, but I think I love an easy soup even more!

This soup is a little bit of chopping, some boiling and voila you have pho!  Pronounced (Fuh?) You actually have to add the question mark to say it right.  In Vietnamese when you say pho you end it like you're super confused/questioning.  Try it with me, oh and don't forget to make the Ron Burgandy questioning face!  Pho (Fuh?)!  You got it!  Don't worry, this comes easy for me because I fully believe I was of Asian decent in another life.  It's completely unnatural how much I love all things Asian!

Now, for all your linguistic hard work, you shall be rewarded with food... you're welcome! 

You'll need:
Cilantro
Green Onions
Jalepenos
Thai Basil
Bean Sprouts
Lime Wedges
Meat (We use lean steak cut into thin slices, it cooks in bowl when broth is added)
Rice Noodles
Pho Broth- ok, so I cheat a little
Seriously large bowls- like HUGE.  We use mixing bowls :)

Chop these:

Boil these as directed:
Boil about 8 minutes just in case the directions aren't in English!

Rinse noodles in lukewarm water to prevent stickage

Layer your goodies:  Start with meat on the bottom so it cooks in the boiling broth!

Add broth:  Make sure you ladle it out while still boiling to ensure proper cooking of the meat.

Add these to taste:
Please disregard the meal replacement shakes in the background, they are NOT part of this.  However, yeay 24 day challenge!

Add a cute sous chef and you're done!

Voila- PHO!  This is such a great dinner and can seriously clear the sinuses if done correctly.  Once you make this soup, you'll crave it!  Hey, maybe you were Asian in a past life too?!  Sister!!! 


Until next time....